Deploying BTCPay Server on LunaNode
Our Toronto cloud servers are a perfect place to deploy BTCPay Server if you are looking for more control over your payment gateway than what's possible with a shared hosting solution.
We provide a web-based launcher that lets you get BTCPay up and running within five minutes. In addition to credit card and Paypal, we accept payments over BTC, Lightning, and various other cryptocurrencies.
Each cloud server is a Linux server (virtual machine) that you can login to and manage over SSH. You have full control over the software in your server, so you can enable plugins and make customizations to your liking. On the other hand, although not needed for initially deploying BTCPay, some familiarity with using the terminal is recommended.
Deploy your VM
- Sign up for a LunaNode account.
- Add funds to your account.
- Create an API key and note the API ID and key.
- Follow the steps on the web-based launcher to deploy your cloud server with BTCPay pre-installed.
After deployment, your BTCPay website will come online and be accessible within a few minutes. It will not be possible to accept payments until blockchains are fully synchronized, which can take several days.
If you get stuck, see the video by BitcoinShirt below or this article:
Pricing
The price will depend on the server plan you select and the number of cryptocurrencies you enable.
You can choose any plan, but if the plan includes too little RAM for the enabled cryptocurrencies then your website may go offline. This is okay since you can always resize to a larger plan later (see FAQ), but our recommendations for getting started are:
- m.2 (2 GB RAM, $7/month): for one small altcoin. m.2 is insufficient for Bitcoin or Monero.
- m.4 (4 GB RAM, $14/month): for 1-3 non-Monero cryptocurrencies.
- m.8 (8 GB RAM, $28/month): for 4+ cryptocurrencies or for Monero.
On top of the plan price, the launcher will create one 60 GB volume per cryptocurrency which costs $1.80/month/cryptocurrency. The launcher will display the total monthly price before deploying the VM.
Our services are prepaid and billed hourly, so if you decide to delete your server during the month then you will be charged proportionally.
FAQ
Please open a support ticket if you encounter issues with your BTCPay deployment. Our services are unmanaged (we provide the server itself but don't provide support for software installed inside the server), but we are happy to help with basic problems. Also try the FAQ below, though, for fixing simple issues.
For more advanced BTCPay questions, like how to customize the template, it is best to ask the BTCPay community on the BTCPay Mattermost.
My website never came online
If you used your own domain name (not btcpayXYZ.lndyn.com), double check that you have set up the DNS records correctly by going to dnschecker.org, entering the domain name (like btcpay.example.com), and ensuring there is just one reported IP and that it matches the external IPv4 address of your server.
My website went offline
Restarting and updating BTCPay will often fix this issue. Login to your BTCPay and run:
$ sudo su -
$ cd /root/btcpayserver-docker/
$ ./btcpay-down.sh
$ ./btcpay-update.sh
Some users experience this issue because they installed a webserver in the server, which interferes with BTCPay. You can try uninstalling the webserver:
$ sudo apt remove nginx nginx-core nginx-common
$ sudo apt remove apache2 apache2-bin
My website keeps going down and back up
This is most commonly caused by your server running out of RAM. To confirm this, login to the web panel, select your server, and go to the Console Log tab. At the bottom, see if there are messages like "out of memory" and "Killed process"; if so, it means your server is running out of RAM.
In this case, you will need to resize your server to a bigger plan. Select your server, press Resize, and choose a bigger plan from the dropdown menu.
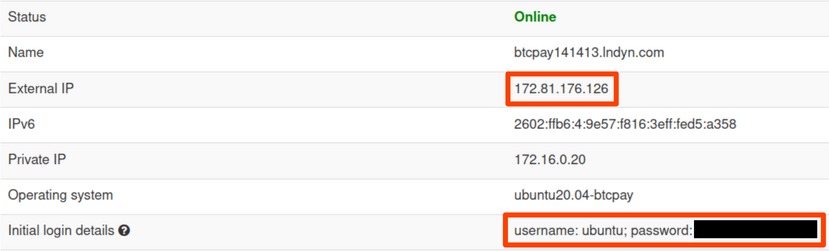
How do I login to my server?
First, you'll need an SSH client. On Windows, we recommend Windows OpenSSH (needs enabling from Settings -> Apps -> Optional Features) or PuTTY (needs download). OS X and Linux generally come with OpenSSH.
Then, select your VM from the web panel and note its external IPv4 address and the username/password displayed under Initial Login Details. We'll assume the IP is 170.75.162.1 and the username is "ubuntu".
Now you can use the SSH client to login to your VM. With OpenSSH, open a terminal and run e.g.:
ssh ubuntu@170.75.162.1
How do I add additional cryptocurrencies?
The easiest way is to use the launcher to create a new VM from scratch. If you want to keep your existing VM, here are the steps:
- Go to Volumes and create a new, empty 60 GB volume. Attach the volume to your VM.
- SSH into your VM and run
sudo su -to login as root. - Run
df -hlandfdisk -lin the VM and compare the output to see what the label of the new volume is. It should be something like/dev/vdeand it should show up infdisk -lbut notdf -hl. - We will assume the volume is
/dev/vde. Runmkfs.ext4 /dev/vdeto format the filesystem on the new volume. - Check this file to see where the volume should be mounted, e.g.
/var/lib/docker/volumes/generated_litecoin_datadir/_data/blocksfor LTC. We will assume LTC for this guide. - Run
blkidand get the UUID of the new filesystem, e.g. it may say/dev/vde: UUID="198a5a96-60de-4e71-839e-ed39622dde47" .... - Add a new line like this to
/etc/fstab, replacing the example filesystem UUID and mount path with the actual values:
UUID=198a5a96-60de-4e71-839e-ed39622dde47 /var/lib/docker/volumes/generated_litecoin_datadir/_data/blocks ext4 defaults 0 2
- Run
mount -a. Then rundf -hland make sure it shows the volume mounted at the correct place. - Check
/etc/profile.d/btcpay-env.shto see what the next freeBTCPAYGEN_CRYPTOxoption is. Let's say 1, 2, 3 are used, so the next one isBTCPAYGEN_CRYPTO4. - Run
cd /root/btcpayserver-docker/and runexport BTCPAYGEN_CRYPTO4=ltcand then run. ./btcpay-setup.sh -i. This should setup the new cryptocurrency. Then usedf -hlto make sure that the new volume is growing in size.